在这篇文章中会介绍以下内容:
- 为什么 Angular 需要编译。
- Angular 编译机制:JiT vs AoT。
- AoT 的工作原理(ngc)。
- AoT 对性能的影响。
这篇文件是基于 Angular8,这个版本的 Angular 的模板引擎还是 View Engine(Angular4 ~ Angular8 模板引擎是 View Engine),这篇文章的编译机制也是基于模板引擎 View Engine,也就是说这篇文章的编译机制适用于 Angular4 ~ Angular8。
Angular9 以后,模板引擎从 View Engine 升级到了 Ivy,Angular 的编译机制也基于 Ivy 重写升级,后续会有新的文章介绍 Ivy。
为什么 Angular 需要编译
Angular 是基于 TypeScript,编译打包的时候会用 tsc 将 TypeScript 编译成 es5 文件,这样在浏览器 JavaScript Virtual Machines (VM) 可以直接运行 es5 代码。那么 Angular 为什么还需要编译呢?在 Angular 中除了 TypeScript 之外,还有 HTML 模板文件,在这些模板文件里有 Angular 自带的组件、指令、管道等等,为了让浏览器可以识别和运行这些东西,那么就需要用 Angular 编译器把这些编译成浏览器可识别和运行的 es5 代码。
Angular 编译机制:JiT vs AoT
Angular 的编译器有两种执行机制:JiT 和 AoT,ng build和ng serve是 JiT 的编译方式,ng build --prod ng build --aot 或者ng serve --aot是 AoT 的编译方式。一句话概括两者的区别:Angular 编译器(ngc)执行的时机不一样,JiT 是浏览器在渲染页面的时候先把 Angular 编译器下载到本地,然后把 HTML 模板编译成浏览器可识别运行的 es5 代码;AoT 是项目在打包的时候就把 HTML 模板编译成浏览器可识别运行的 es5 代码,在浏览器渲染时不需要下载 Angular 编译器也不需要编译,直接运行这些代码就可以了。整个流程如下:
JiT
- 基于 TypeScript 开发 Angular 项目
- 用 tsc 编译 Angular 项目
- 打包
- Minification
- 部署

当用户访问这个网站的时候:

- 下载相关的静态资源文件,包括 Angular 编译器(@angular/compiler)
- 启动 Angular
- Angular 编译器执行编译(ngc)
- 页面渲染
AoT
- 基于 TypeScript 开发 Angular 项目
- 编译 Angular 项目
  - 先把模板和 component 编译成 TypeScript/es6(ngc)
  - 再把 TypeScript 编译成 es5 (tsc)
- 打包
- Minification
- 部署

当用户访问网站的时候:

- 下载相关的静态资源文件,不需要下载 Angular 编译器(@angular/compiler)
- 启动 Angular
- 页面渲染
从上面的流程可以看出,用 AoT 编译方式打包,在页面渲染的时候不需要下载 Angular 编译器代码,也不需要执行编译,而是直接渲染页面。从性能上来说,AoT 要胜过 JiT。除了编译时机不同,我们还可以通过代码来看看两种编译方式的 bundle 文件有什么区别。创建一个 Angular 项目,然后运行ng build ng build --prod来看看最后编译文件有什么不同。
示例源码在这里:【angular-performance】
代码结构如下:
--src
 -- app
   -- modules
     -- dashboard
       - dashboard.component.html
       - dashboard.component.ts
       - dashboard.module.ts
     -- deep-understanding-aot
       - deep-understanding-aot.component.html
       - deep-understanding-aot.component.ts
       - deep-understanding-aot.module.ts
   -- shared
 - index.html
 - main.ts
 - styles.css
其中 deep-understanding-aot 组件,用来显示当前时间,代码如下:
// deep-understanding-aot.component.ts
import { Component, OnInit } from "@angular/core";

@Component({
    selector:"app-deepunderstand-compiler",
    templateUrl: "./deep-understanding-aot.component.html"
})

export class DeepUnderstandingComponent implements OnInit {
    public title ="let's learn angular compiler together!";
    public time = new Date();
    ngOnInit() {
        setInterval(()=>{
            this.time = new Date();
        },1000)
    }
}
<!-- deep-understanding-aot.component.html -->
<div class="margin-large">
    <h1></h1>
    <h2>here is current time:  { {  time | date: 'hh:mm:ss a'  } } </h2>
</div>
运行 ng build(JiT)
编译之后的文件如下:
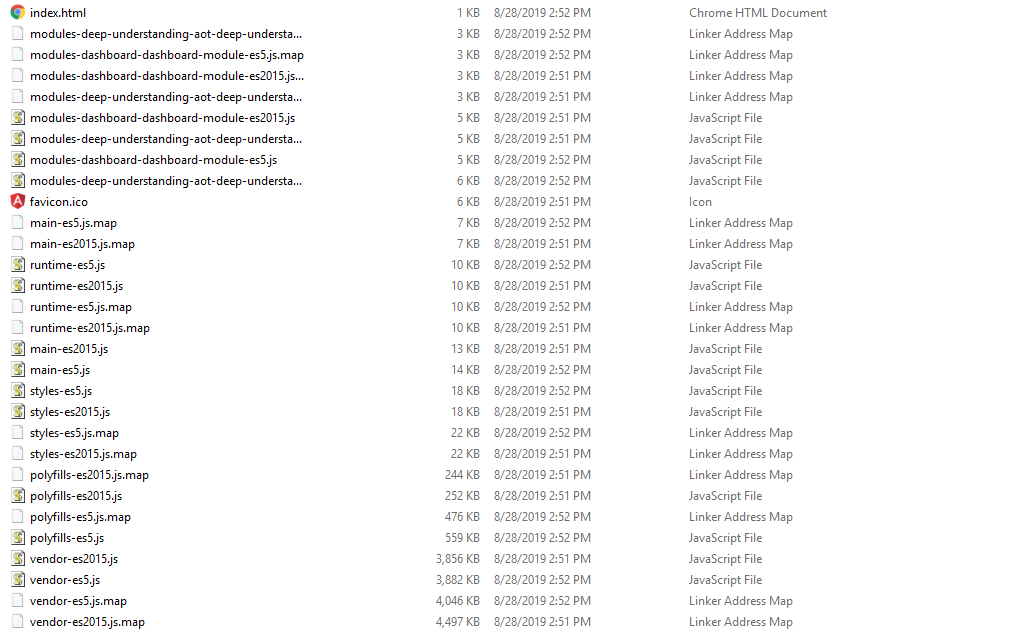
我们可以看到 vendor 文件最大,vendor-es5.js 有3882KB,vendor-es2015.js 有3856KB。我们可以通过工具【source-map-explorer】来看看 vendor 文件里到底有什么。
//先安装 source-map-explorer
npm install -g source-map-explorer

// 运行如下命令,查看 vendor-es5.js
npx source-map-explorer dist/angular-performance/vendor-es5.js
vendor-es5.js 文件结构如下;
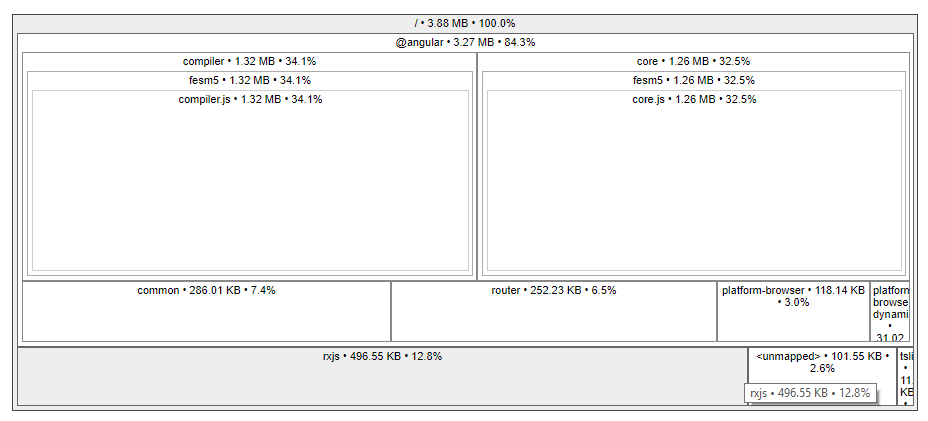
我们可以看到因为 JiT 是在页面渲染的时候编译模板文件,所以需要打包 compiler 源码,compiler 源码就有 1.32M! DeepUnderstandingComponent 对应的 bundle 文件(JiT)是:modules-deep-understanding-aot-deep-understanding-aot-module-es5.js,我们来看看文件内容:
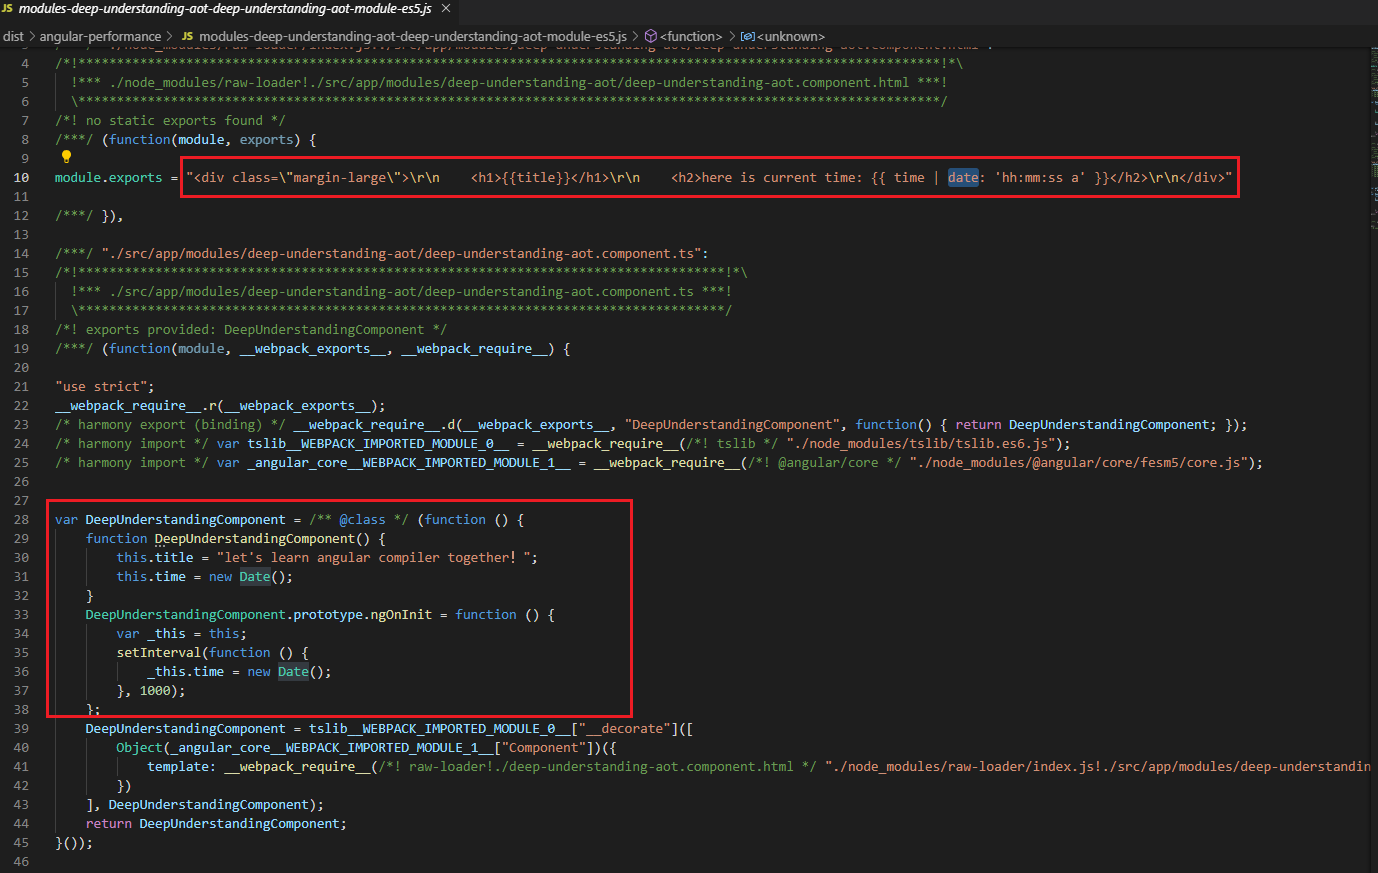
从上面的图片我们可以看到,JiT 编译在打包过程中不会编译模板文件,HTML 直接以内联的方式放在 bundle 文件里,保留了 Angular 的 { { } } 和 date pipe;component 只是把 TypeScript 语法编译成了 es5 的语法。
运行 ng build:prod(AoT)
默认ng build:prod不会产生 source map 文件,由于我们需要用 source-map-explorer 工具分析 bundle 文件结构,所以需要在运行ng build:prod也产生 source map 文件。需要改动 angular.json 文件配置,改动如下:
//angular.json

      "architect": {
        "build": {
            ......
            ......
          "configurations": {
            "production": {
              ......
              ......
              "sourceMap": true, // 把sourceMap设置为True
              ......
              ......
            }
          }
        }
      }
编译之后的文件如下:
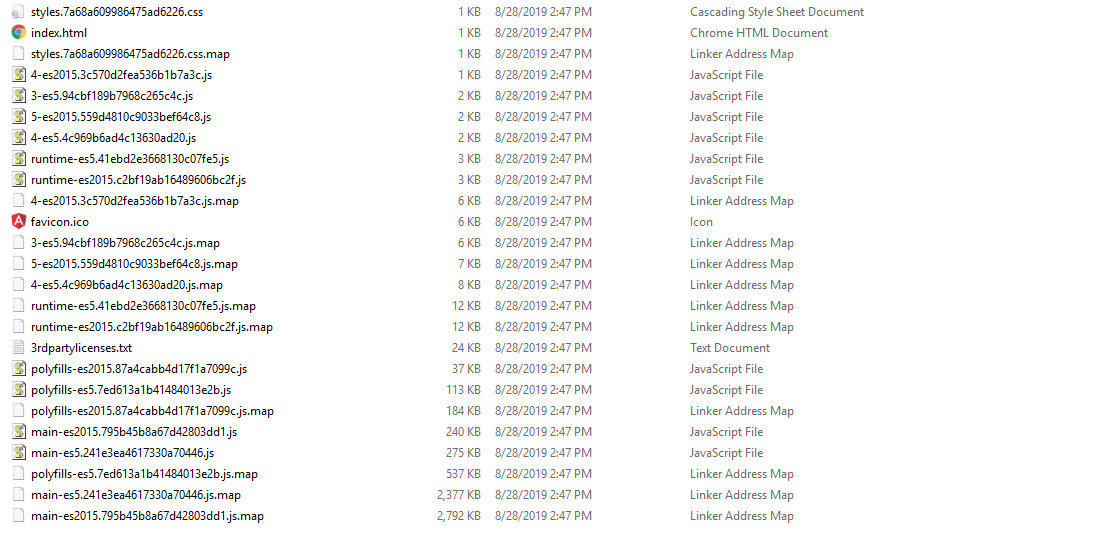
我们看到 main 文件最大,其中 main-es5.241e3ea4617330a70446.js 有275KB。
// 运行如下命令,查看main-es5.241e3ea4617330a70446.js
npx source-map-explorer dist/angular-performance/main-es5.241e3ea4617330a70446.js
main 的文件结构如下:
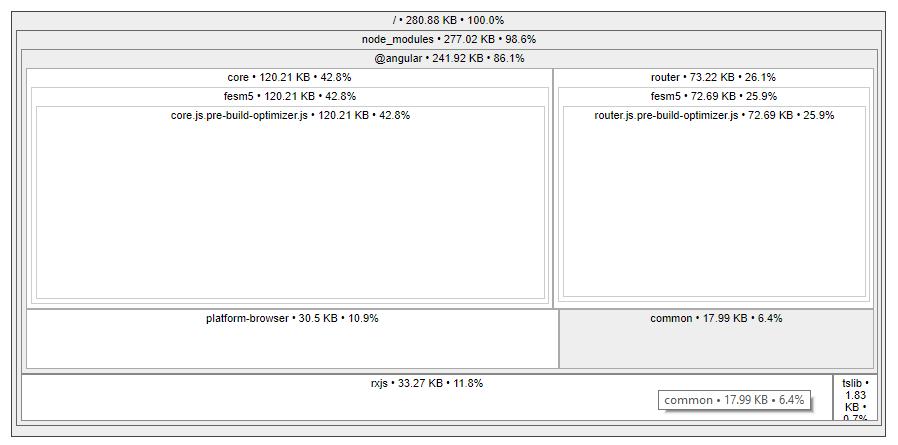
我们可以看到由于 AoT 在打包的时候编译模板文件,所以不需要把打包 compiler 源码,bundle 文件明显减小了很多!DeepUnderstandingComponent 对应的 bundle 文件(AoT)是4-es5.4c969b6ad4c13630ad20.js,我们来看看里面的内容:

整个文件都被 minify 和 uglify,通过关键字here is current time搜索,可以看到 Angular 的 { { } } 和 date pipe这些都被编译 es5 代码。
来总结一下 JiT 和 AoT 的主要区别:
- 打包之后的文件大小不一样,最大的区别是 JiT 需要把 compiler 源码打包进 bundle 文件,而 AoT 不需要。
- bundle 文件的内容也有很大区别:JiT 把 HTML 模板直接内联进 bundle 文件不做任何处理,AoT 会把 HTML 模板文件编译 es5 文件。
- 编译执行的时机不一样,JiT 是在浏览器里执行,需要内联的 HTML 文件编译成 es5 代码;AoT 是在编译打包的时候就把 HTML 文件编译成 es5 代码。
接下来看看,AoT 是如何把模板文件编译成 es5 文件的。
AoT的工作原理(ngc)
AoT 编译实际分了两个步骤:
- 第一步:用 ngc 把模板和 component 编译成 es6(或者是 TypeScript 代码,可以在 tsconfig.json 里配置)。
- 第二步:用 tsc 把这些 TypeScript 编译成 es5。
ng build --prod只能看到第二步的 es5 文件,那么有没有办法看到第一步的 es6 文件呢?当然有的,可以运行 ngc 命令,我们在package.json的 scripts 节点里加上如下命令:
  "scripts": {
    ......
    ......
    "compile": "ngc"
    ......
    ......
  },
运行npm run compile,我们来看看 deep-understanding-aot 组件在 ngc 编译完以后是什么样的:
编译之后的目录是在tsconfig.json文件的 outDir 定义的,配置如下:
  "compilerOptions": {
    "baseUrl": "./",
    "outDir": "./dist/out-tsc",
    "sourceMap": true,
    ......
    ......
  },
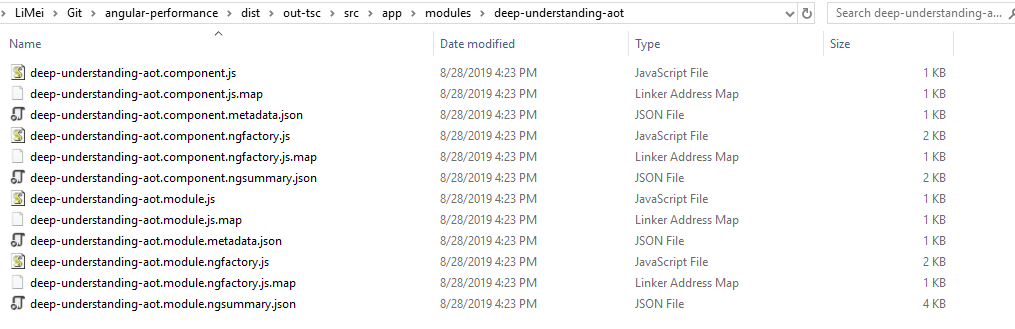
ngc 编译的输出文件目录结构和真正的项目目录结构一样,在对应的文件夹下会有以下文件:
-
*.metadata.json:把 .ts(component/NgModule) 文件里的 decorator 信息和c onstructor 的依赖注入信息用 json 的形式记录下来,下次在二次编译的时候不需要再从 .ts 文件里拿了。二次编译是指在自己项目中引用第三方库,在编译自己项目的时候需要对第三方库进行二次编译打包。如果我们自己项目要用AoT编译,那么第三方库必须要提供 .metadata.json 文件。 -
*.ngfactory.js:里面包含了创建组件、渲染组件(涉及 DOM 操作)、执行变化检测(获取 oldValue 和 newValue 对比)、销毁组件的代码,也就是我们说的 component view。 -
*.js:是 .ts(component/NgModule) 文件里除 decorator 和 constructor 之外的内容,编译成了 es6 代码。 -
*.ngsummary.json:经包含了 .metadata.json 中所有的信息,因此如果使用了 ngsummary.json,就不需要 .metadata.json了。
对于*.metadata.json *.js和*.ngsummary.json都很好理解就不详细一一介绍,我们来看看*.ngfactory.js文件里到底有什么内容,同样以 DeepUnderstandingComponent 为例,ngc 产生的 ngfactory 文件为deep-understanding-aot.component.ngfactory.js,内容如下:
/**
 * @fileoverview This file was generated by the Angular template compiler. Do not edit.
 *
 * @suppress {suspiciousCode,uselessCode,missingProperties,missingOverride,checkTypes}
 * tslint:disable
 */
import * as i0 from "@angular/core";
import * as i1 from "@angular/common";
import * as i2 from "./deep-understanding-aot.component";
var styles_DeepUnderstandingComponent = [];
var RenderType_DeepUnderstandingComponent = i0.ɵcrt({ encapsulation: 2, styles: styles_DeepUnderstandingComponent, data: {} });
export { RenderType_DeepUnderstandingComponent as RenderType_DeepUnderstandingComponent };

export function View_DeepUnderstandingComponent_0(_l) {
    return i0.ɵvid(0,

        [i0.ɵpid(0, i1.DatePipe, [i0.LOCALE_ID]),
        (_l()(), i0.ɵeld(1, 0, null, null, 5, "div", [["class", "margin-large"]], null, null, null, null, null)),
        (_l()(), i0.ɵeld(2, 0, null, null, 1, "h1", [], null, null, null, null, null)),
        (_l()(), i0.ɵted(3, null, ["", ""])),
        (_l()(), i0.ɵeld(4, 0, null, null, 2, "h2", [], null, null, null, null, null)),
        (_l()(), i0.ɵted(5, null, ["here is current time: ", ""])),
        i0.ɵppd(6, 2)],

        null,

        function (_ck, _v) {
            var _co = _v.component; var currVal_0 = _co.title;
            _ck(_v, 3, 0, currVal_0);
            var currVal_1 = i0.ɵunv(_v, 5, 0, _ck(_v, 6, 0, i0.ɵnov(_v, 0), _co.time, "hh:mm:ss a"));
            _ck(_v, 5, 0, currVal_1);
        }
    );
}

export function View_DeepUnderstandingComponent_Host_0(_l) {
    return i0.ɵvid(0,
        [(_l()(), i0.ɵeld(0, 0, null, null, 1, "ng-component", [], null, null, null,
            View_DeepUnderstandingComponent_0, RenderType_DeepUnderstandingComponent)),
        i0.ɵdid(1, 114688, null, 0, i2.DeepUnderstandingComponent, [], null, null)
        ],
        function (_ck, _v) { _ck(_v, 1, 0); }, null);
}
var DeepUnderstandingComponentNgFactory = i0.ɵccf("ng-component", i2.DeepUnderstandingComponent, View_DeepUnderstandingComponent_Host_0, {}, {}, []);
export { DeepUnderstandingComponentNgFactory as DeepUnderstandingComponentNgFactory };
//# sourceMappingURL=deep-understanding-aot.component.ngfactory.js.map
我们可以看到在 ngfactory 文件里有:
-
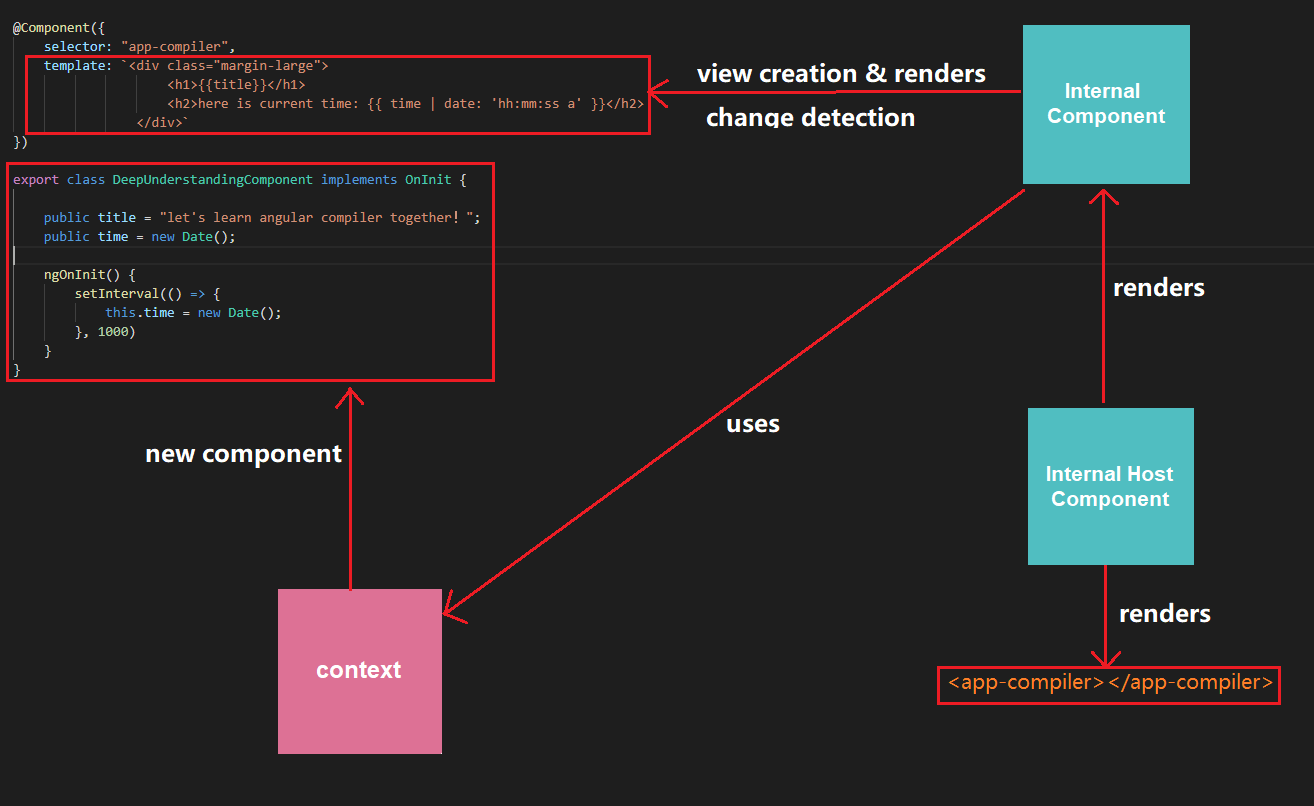
View_{COMPONENT}{COUNTER}(View_DeepUnderstandingComponent_0) 是:the internal component,负责(根据template)渲染出组件的视图和进行变化检测。 -
View_{COMPONENT}_Host{COUNTER}(View_DeepUnderstandingComponent_Host_0) 是:the internal host component,负责渲染出宿主元素 < app-compiler > < / app-compiler > ,并且使用 “the internal component” 管理组件的内部视图,也是通过这个构建整个组件树。
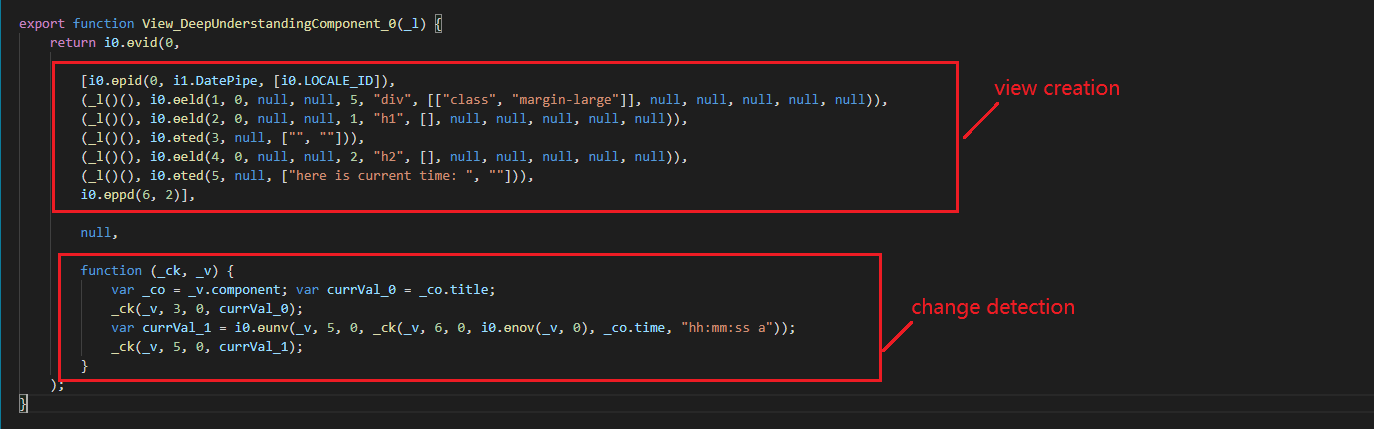
在 View_DeepUnderstandingComponent_0 的视图创建和变化检测代码如下:
关系图如下:
总结来说:AoT 之后,HTML 模板文件会被编译成一个视图(es6),在这个视图里会把页面元素(div h1 h2)都渲染出来,并且生成绑定和变化检测代码,同时也 host component 的信息。
其实 ngfactory 就是 Component View。在*.ngfactory.js过程中,ngc 会把所有可能发生变化的DOM Nodes/Elements都找出来,然后给这些DOM Nodes/Elements生成Bindings,这些Bindings里会记录Element Name/Expression/OldValue,一旦有异步事件发生(Click事件或者是HttpRequest)就会被ngZone捕获到,然后触发Change Detection,也就是会从Root Component开始,从上到下检查所有组件的Bindings也就是前面提到的Component View,对比NewVaule和OldValue,如果不一致就会把新值更新到页面,同时把新值更新为旧值(这也就是我们经常提到的脏检查机制Dirty Checking)
AoT 对性能的影响
不管是 JiT 还是 AoT,最终的结果文件是一样的。JiT 编译的 bundle 文件,在浏览器渲染之前需要下载 compiler 源码,然后 compiler 源码对 JiT 的 bundle 文件进行编译,也会在本地生成*.ngfactory.js文件,最后进行渲染。在浏览器里先编译再渲染肯定没有 AoT 直接在浏览器里渲染性能高。
除此之外,还有一点好处是,AoT 把模板文件编译成 es6 文件,可以做 Tree-Shaking,也会提高性能。
但是需要注意的是在 Angular9 之前的版本,用的是 View Engine 模板引擎,是没办法做 Tree-Shaking。在 Angular9 版本之前虽然 AOT 编译对性能和缩小 bundle 文件的大小有很大的提升,但是 HTML 模板这块,性能优化并不大。在 Angular9 之后的版本默认使用 Ivy 模板引擎才在 HTML 模板性能这块有了非常大的提升。